Prepare the Seeds/Herbs
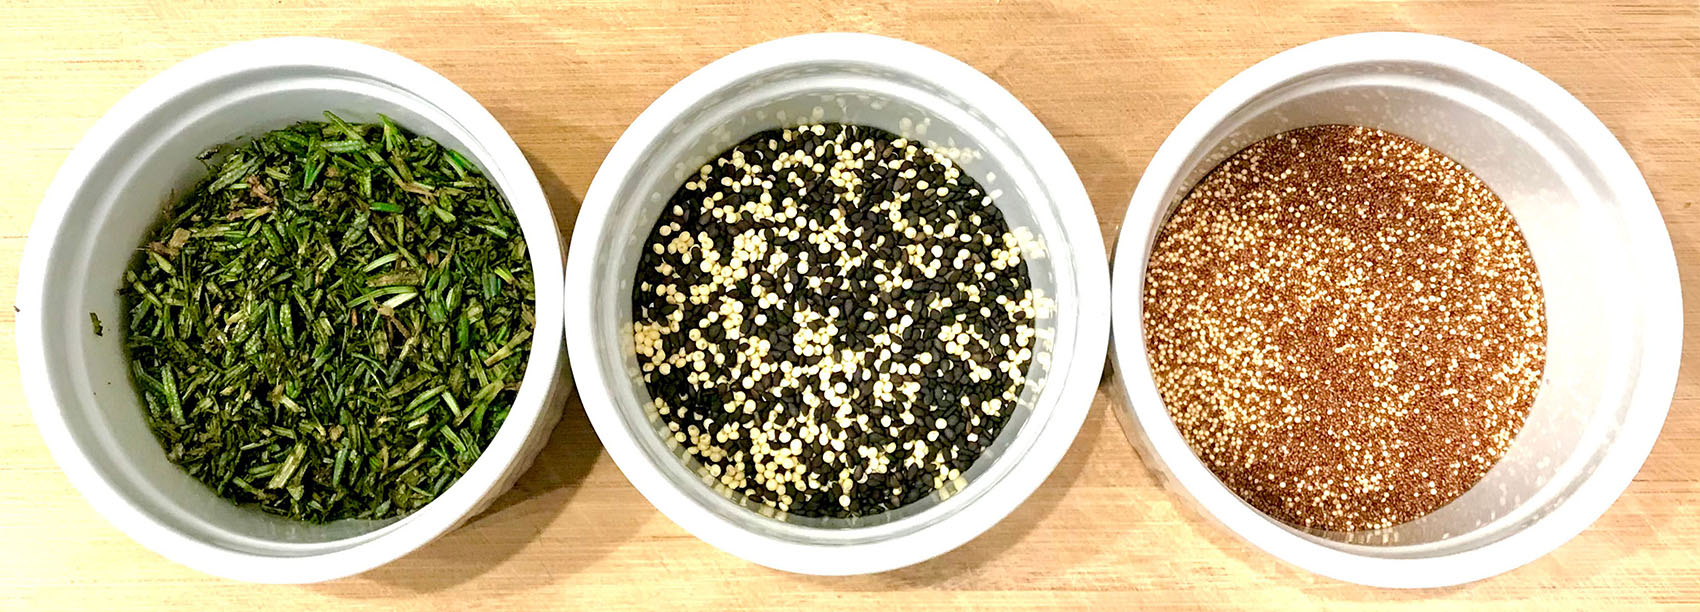
Step 1 Roast the larger seeds (sesame) together in a dry skillet over medium heat on the stove. The seeds are done when you can smell a toasty nutty aroma (about 3--5 minutes). Remove the seeds from the skillet and place in a bowl to cool. Add in the smaller seeds (teff and amaranth), turn the heat down slightly, and roast 1-2 minutes until you smell a nutty/fragrant aroma. Generally, the amaranth will start to turn a slightly golden color. Remove the seeds from the skillet and place in the same bowl as the sesame seeds and allow a few minutes to cool.
Step 2 While the seeds are cooling, if using fresh rosemary sprigs, lightly rinse sprigs and shake off excess water. Pull the green petals/leaves off the stalk and mince finely. Do not mince the stalk, these are too tough and should not be included in the bread. Set aside the minced rosemary.
Prepare the Dough Mixture
Step 3 Using a digital scale, place a medium to large bowl onto your scale and zero out (tare) the bowl. Add the bread flour and then the whole wheat flour. Remove the bowl from the scale and using a large spoon or wooden/rubber spatula, stir the two dry flours to fully mix them together. Add in the salt and yeast and mix again to fully incorporate. Next, add in your minced rosemary and mix to fully incorporate. Once your rosemary is fully incorporated, add in your cooled seeds (make sure they are not scorchingly hot or they could kill the yeast) and stir/mix until evenly incorporated into the dry mixture.
Step 4 Place a Pyrex (or other glass) measuring cup (2 cup or larger capacity) on your digital scale, zero out (tare) the container and begin pouring water into the Pyrex container on your scale until you reach the desired water weight. If you go over, use a small spoon to dip in and remove some of the water. Once at your desired weight, microwave the water to about 90°F. Alternatively, you can use warm tap water. If you don't have a thermometer, just use your finger to test. The water should be lukewarm not hot. Add the water to the container with the flour mixture and stir with your spoon or hand. Mix until all the flour is incorporated. It will be a shaggy/sticky mixture.
Step 5 Once mixed, wet your hands and reach in a pinch the dough between your thumb and hand to mix it. Don't worry if the flour sticks to your hands, you can scrape it off into the mixture when finished. Continue to mix and pinch the dough until its completely mixed and there are no dry spots. Cover the bowl with a kitchen towel and let the dough sit for 30 minutes.
Folding the Dough
Step 6 After the 30 minute rest from Step 5, wet your clean counter top with your water spray bottle then wet your hands and your dough scraper. Scrape the dough out of the bowl onto the wet counter top. Gently stretch the dough into a roundish mas. Grab an edge of the dough with your fingers on one hand and pull/stretch the dough away from the round mass. Hold the dough mass with your other hand. Then fold the pulled/stretched part back onto the round mass and gently press it down. Turn the round dough mass and repeat about 12 times. You are basically gently stretching and folding the dough onto itself to build structure. This is a gentle process and you can use a lite touch; no heavy kneading here! When you are finished, pick the dough mass up and cup it in your hands and roll it around in your hands cupping it to form it into a ball shape. Place back into the bowl and cover with a kitchen towel and let the dough rest for 2 hours.
Step 7 After two hours, your dough should be puffing up and increased in size. Repeat Step 6 again. When you have finished and placed your dough back into the bowl and covered with a towel, let it rest for two hours again.
Step 8 After the two hours from Step 7, you will be performing the pre-shaping of your dough. Prepare your surface by sprinkling a little flour on the counter (we will no longer be using the water spray bottle). Turn your dough out of the bowl onto your lightly floured surface. Gently push the dough down with your fingers and shape into a general square shape. No need to be precise here. Preshape your bread by grabbing the left side of your dough square and pulling it aware from the square and then folding it back about half the width of the square, press it down gently on the dough square to secure the fold. Repeat the same process with the right side of your dough. Then repeat this folding process for the top and bottom of your square. Make sure you gently press each of the seams to seal them. When finished, pick your dough up and turn it over in your hands so the flour side is up, seams sides down and gently cup your bread while turning it in your hands to form a ball. Place the ball back into your bowl seam side down, and cover with your towel. Let the dough rest 1 hour.
Step 9 After the one hour rest from Step 8, lightly flour your work surface and turn the dough out with the flour side down and the seam side up. Use your fingers to gently push down the dough slightly and form the dough into a square shape. Again, stretch the left edge and fold it to the center of the dough square. Repeat with the right side of the dough. Then take the top of the dough, stretch and then then fold back to about a quarter of the dough square. Begin rolling the top towards the bottom keeping tension on your dough as you roll. When you reach the bottom of the dough square, pinch the seam to close it. Roll the dough on the counter a little to make it into a roughly symmetrical cylinder. Place the dough into your floured shaping basket with the seam side up. Cover the basket with a towel and let rest for about 30 minutes. After thirty minutes, remove the towel and place the dough in the refrigerator uncovered over night. The uncovered dough will develop a slight skin that will provide good tension.
Scoring/Baking/Enjoying your bread
Step 10 Remove your dough from the refrigerator, place a piece of parchment paper on your work surface and turn the dough out of the shaping basket with the seam side down onto your parchment paper. The using a sharp knife or razor blade, lightly score (about 1/4 to 1/2 inch, the surface of your dough. Lifting the dough with the parchment paper, gently place your dough into your Dutch oven, place the lid on the Dutch oven and put the Dutch oven into your oven on a lower rack. Turn your over to bake at 425 F and set your timer for 30 minutes. Do not open the oven or your Dutch oven. Also, do not preheat your oven; start your bake cold.
Step 11 After 30 minutes baking, carefully open your oven and very carefully remove the lid from your Dutch oven and close your oven door. When you remove the lid from your Dutch oven, generally you will see a large billow of steam escape from the open Dutch oven so please be careful! Set your timer to 10 minutes. You are now baking your bread in the uncovered Dutch oven. Your bread should have puffed up during this first 30 minutes of covered baking. After the 10 minute mark, increase your oven temperature to 450° F and set your time for 15 minutes. At the 15 minute mark, slightly open your oven and look at your bread. You want the crust to be dark. If you have a thermometer probe, you can take your Dutch oven out of your baking oven and insert your thermometer into your bread; the internal temperature should be around 200° F. At this point, I generally bake my bread another 3 minutes if the crust is not dark brown. The darker your crust the more flavor your bread will have, just don't burn it please. Remove your bread when you are satisfied with the crust color. Total baking time should be 30 minutes covered in the Dutch oven, 25 minutes uncovered in the Dutch oven (10 minutes at 425° F and 15 minutes at 450° F). Carefully reach into your Dutch oven and lift your bread out and place on a wire rack to cool. Because you are reaching into a hot Dutch oven, be careful not to burn your arms on the sides of the Dutch oven, I generally use full-hand (mitten type) hot mats. Let your bread cool for at least 15 minutes. After it has cooled, slice a piece and enjoy with or without your favorite topping.
1 Oven Bake Method
As an alterative to using a Ducth oven for baking your bread, you can follow this oven-bake method. Preheat your oven to 450° F. Carefully fill (1/3--1/2 filled) a large baking pan with hot/boiling water and place on the lowest rack in your oven. This will provide the necessary steam for your bread. Once your oven containing the baking pan of water has reached 450° F, place your dough on a parchment paper-lined baking try (or preheated baking stone) and place in the oven. Bake at 450° F for 15 minutes. Reduce the Oven temperature to 425° F and continue to bake for another 20 minutes. Resist the temptation to open your oven. You want to retain as much steam as possible. After the 20 minutes, carefully remove your loaf (there will be steam, be careful!) from the oven and check to see if done. You can adjust baking times a few minutes depending on the level of bake on your bread.

 View/Print Recipe
 Leave a Comment